So you have landed yourself a new client and you want to know how to onboard them in the smoothest way possible. Here is my 6 step guide on smoothly onboarding a new client into your business and getting off to the best possible start.
Although there are great tools out there that you can use as your client onboarding software – Dubsado being a great example. Onboarding a client well is not just about the software that you use, it starts right from the moment you start speaking to them all the way through to that first month of work and the level of communication that you use.
And so the first step (pre-onboarding) is getting them onto a discovery call and doing it well!
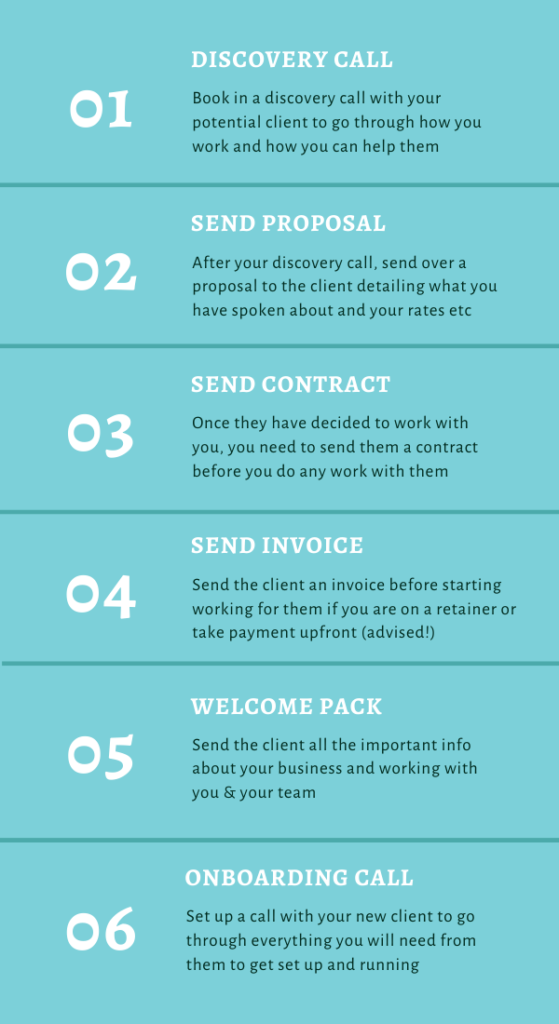
1. Getting the Discovery Call Process Right
Running a discovery call (or your sales call) is not just as easy as using a discovery call script, and it is just as much about you deciding if you want to work with them as it is about them deciding if they want to work with you.
The key to a running a discovery call well is doing your research on the client before hand, so you can mention areas of their business you are familiar with or have noticed you could help them with (i.e. their socials, their website etc). Asking the right questions and getting across to the client that you are the right person for them, showing you are intuitive, helpful and proactive.
So what kinds of questions should you be asking on your call – ask them things around:
- Exactly what their business is and what their goals are
- What they will be like as a client (whether there are any red flags)
- What they want help with specific to the type of VA you are
- Whether they are happy with the way you work and it fits with their expectations
- How many hours they would like you to work for them
If you want to go into your next discovery call knowing you have everything ready that you need to ask and feeling confident AF to own that call, download my Roadmap on Owning Your Discovery Calls.
2. Writing your Business Proposal & Template
If your discovery call goes well, the next step is to send the client a business proposal, and you might be wondering how to write a winning business proposal.
TIP: Never overpromise and underdeliver – be realistic with the client at the end of your initial call about when you can get the proposal over to them. You will want to write it as soon as possible (as they could be speaking to multiple people), but the worst thing you can do is tell them it will be with them by the end of the day tomorrow and it takes you 4 days to send it over to them – it doesn’t create a great first impression. So be realistic!
What to include in your proposal
The key areas to include in any service provider proposal are:
- What you understand to be the client requirements (which you will explore in your initial discovery / sales call)
- About you and how you can help them specifically – this isn’t a section to list your qualifications like a CV, but more about how your skills or experience will benefit them i.e. why you are the right person for them
- What tasks / projects / areas of their business you will be helping with
- Your proposal terms: how many hours you estimate this to take, your hourly, project or day rate, start and end date of project (if there is one)
These areas are not just related to a virtual assistant client proposal, but any proposal for business if you provide a service.
If you would like to get your hands on the business proposal template that I use in my own business, click here. The template covers what you should include and goes through real examples of what I have written in my own proposals.
3. Sending Your Virtual Assistant Business Contract
Having a contract to send to your clients is super important for protecting your business and protecting your boundaries.
So why do you need a contract and what should you make sure you include?
Having a contract is key to a good client relationship for so many reasons:
- It protects you legally
- It allows you to set out your boundaries clearly and to have a place to refer to if they are ever pushed by a client
- It gives the client protection
- It covers you for all types of situations that can arise
After working in my OBM business for 3 years, I have come across or heard of so many situations that people just forget to include in their contract and become a bit stuck. Imagine if your client goes on holiday and just doesn’t give you any work that month, so decides not to pay your invoice. What if they don’t give you any work for the first 3 weeks of the month and then suddenly ask you to do a MOUNTAIN of work that you just cannot fit in before month end with your other client requirements.
My Ultimate Onboarding Guide covers all of this – it goes through exactly what you need to include in your contract to cover yourself for all these kinds of situations.
And if you’re looking to write a contract for your own business, I recommend checking out the Virtual Assistant contract with Koffee Klatch for a contract template that is customisable and is written by a legal team.
4. Create and Send Your First Invoice
It is completely normal in the Virtual Assistant industry to invoice for your work upfront i.e. before you do any work for them. This is especially the case if you are working on a retainer model (where you sell a number of hours to the same client each month).
There are tons of different tools to use out there to create your invoice and you can even make your own invoice template on Canva, Office or Google Docs for example.
Most software does charge to create invoices and back in the day the most popular tool was Wave, but unfortunately in the UK it is not free anymore to use. But there are still free tools out there (which are listed in my Guide).
5. Sending a Welcome Email or Welcome Pack
Once you have sent your invoice and had the contract signed you’re ready to start working with the client. A welcome pack or email is not essential, but is a nice way to show your professionalism and show off your skills.
So what kinds of things should you include in a welcome email / template?
- The next steps for working together – what they can expect
- What you need from them to get started
- The best way to get in contact with you (email, phone call, Slack, Teams etc)
- If you have a team, include an intro to who they are and what they specialise in
- Set up a time for your kickoff / onboarding call
You can purchase a fully customisable Canva welcome pack template here (coming soon).
6. The Kickoff / Onboarding Call Checklist
The onboarding call is super important to make sure you get all the right information you need from them to make the first few months of working together as smooth as possible.
You know when you first take on a client and it feels slightly clunky, you’re to-ing and fro-ing with logins, they’re trying to get you set up on everything and then oops you forgot to ask them for their branding ….It just feels a bit … awkward and slightly energy draining.
This can all be avoided by asking everything you need to in your onboarding call.
- Make sure you get all the logins you need
- Ask them all the right questions about how they like to work specifically (and how they don’t)
- Show them the best ways to share work with you
Get your hands on the onboarding call checklist here.
The Ultimate Onboarding Guide with Templates
If you want to learn the best way to onboard your clients and get your hands on all the tips and templates, The Ultimate Onboarding Guide will save you hours in questioning if what you’re doing is right and putting together the process yourself.
So what exactly does it include?
- Roadmap to owning your discovery calls – have your dream clients knowing you’re the perfect person for the job, spot any red flags and find out exactly what they need help with
- The exact proposal template I have used for all of my OBM clients
- Everything you need to include in your contract to protect your boundaries
- An invoice template and 3 free invoicing systems to use to create and track your invoices
- Exactly what to include in your welcome email, so you don’t forget anything
- Useful tools to impress your clients and make the onboarding process as smooth as a baby’s …
- Onboarding checklist – learn everything to ask your client so you have everything you need to hit the ground running – logins, communication, what to share etc
- Bonus 1 – ClickUp leads tracker: log the source of all your leads and keep track of the whole onboarding process for every client plus a 5 minute training video
- Bonus 2 – Welcome kit Canva template: send your client everything they need in one very pretty PDF
To get your hands on the guide, click here.
Click here to take a look at all the guides or templates mentioned in this blog.